Airbrush Nail Art Is Back
:upscale()/2021/10/01/754/n/1922153/5b3d5fb46157401b8480c3.26889099_.jpg)
Everything old is new again: claw clips, french manicures, lip gloss, Farrah Fawcett-level volume, and, most recently, airbrush nail art. For the unfamiliar, airbrushed nails are done using a spray-paint effect to give a look similar to graffiti or ombré. Since its glory days in the '80s and '90s, airbrush manicures had fallen out of style for a little while but they're now making a major comeback in 2021.
Overall, nails have seen the most exciting revival over the last few years with new trends popping up seemingly every week. It's hard to open Instagram without seeing an intricate design or extra-long tips on your screen, and celebrities like Megan Thee Stallion, Billie Eilish, Lizzo, and Jennifer Lopez are certainly helping matters with their abundant manicure inspiration.
Of all the recent nail design trends to make their way into the mainstream, airbrush nail art is something most people can do at home with the right tools. If you want to replicate the professional airbrush manicure process, you'll need an airbrush gun from Amazon, like the Ebest Multi-Purpose Airbrush Nail Art System ($44), but you can mimic a similar effect with a makeup sponge (more on that later).
To learn how to get the look at home, we tapped Hannah Lee, a manicurist and Sally Hansen brand ambassador. Keep scrolling for the step-by-step.
:extract_cover():upscale():fill(ffffff)/2021/10/01/754/n/1922153/5b3d5fb46157401b8480c3.26889099_.jpg)
Step 1: Paint Your Nails a Base Color
First things first: gather all of your supplies — like paper towels, your base coat, your desired nail-polish colors, an airbrush gun, stencils (if you want), and a topcoat — and put them within reach. Then, after you clean up your nails by trimming and filing them to your desired shape, paint your nails with a base color of your choice.
Step 2: Prep Your Airbrush Gun
Once your base coat dries (give it at least one minute), it's time to load your airbrush nail gun with a water-based paint. "Regular nail polish is very thick and will clog it so that is not recommended," Lee said. A kit like the Ophir Nail Ink Airbrushing Kit ($116) is a bit pricier, but it has everything you need inside: the tool, water-based paints, stencils, and cleaning instruments.
Test the airbrush paint on a paper towel first to ensure it's smooth and working properly, and make sure you have additional paper towels down on your workspace. "Another tip is to border your nail with scotch tape or liquid latex (like PrettyDiva Liquid Latex For Nails ($13)) to help prevent any excess paint from going onto the skin," Lee said.
:extract_cover():upscale():fill(ffffff)/2021/10/01/758/n/1922153/e2b4511b61574198c069a6.00555561_Screen_Shot_.png)
:extract_cover():upscale():fill(ffffff)/2021/10/01/758/n/1922153/a1d8c7f8615741913964d3.80206341_Screen_Shot_.png)
Step 3: Spray Your Nails
Now you're ready to spray your nails in a design of your choice. "I love doing cute hearts and stars — the best and easiest way to achieve that look is to use stencils," Lee said. "Apply the stencils to the nail then begin to spray the paint." Once you've done all 10 fingers, finish with a topcoat to seal the design in and prolong your manicure. We like the O.P.I Nail Treatment Top Coat ($10). You can also add adornments like jewels and other 3D decorations to your nails.
"I recommend the Sally Hansen Nail Pro Tool Kit ($8) and the Nail Pro Brush Kit ($6)," Lee said. "The Tool Kit includes a variety of stencils that are perfect for airbrushing designs and the Brush Kit has an angled brush that makes it very easy to clean up around the nail in case of any excess paint."
:extract_cover():upscale():fill(ffffff)/2021/10/01/759/n/1922153/c2116ac5615741a149f480.65909220_Screen_Shot_.png)
:extract_cover():upscale():fill(ffffff)/2021/10/01/759/n/1922153/d8e5c3ee615741b44d0191.41367834_Screen_Shot_.png)
:extract_cover():upscale():fill(ffffff)/2021/10/01/759/n/1922153/3c681c62615741bf5286b5.32057599_Screen_Shot_.png)
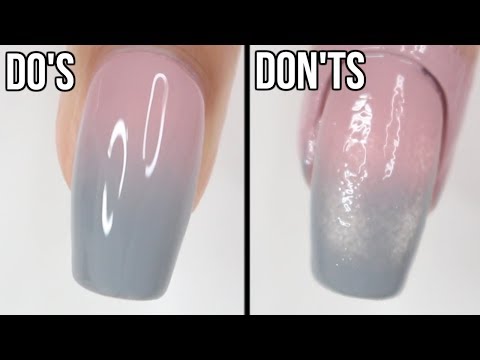
How to Fake Airbrushed Nails With a Makeup Sponge
No airbrush gun? No problem. You can fake the look of ombré airbrushed nails with wedge-shaped makeup sponges ($2) from the drugstore and regular nail polish. Simply paint your nails a base color and wait for it to completely dry. Then, pick two nail-polish colors and paint the rectangular end of the makeup sponge in two thick stripes. Then, press the sponge onto your nails while it's still wet. Repeat that process until the color is to your liking and seal it with a topcoat.
:extract_cover():upscale():fill(ffffff)/2021/10/01/721/n/44344577/shoplWvuDW.jpg)